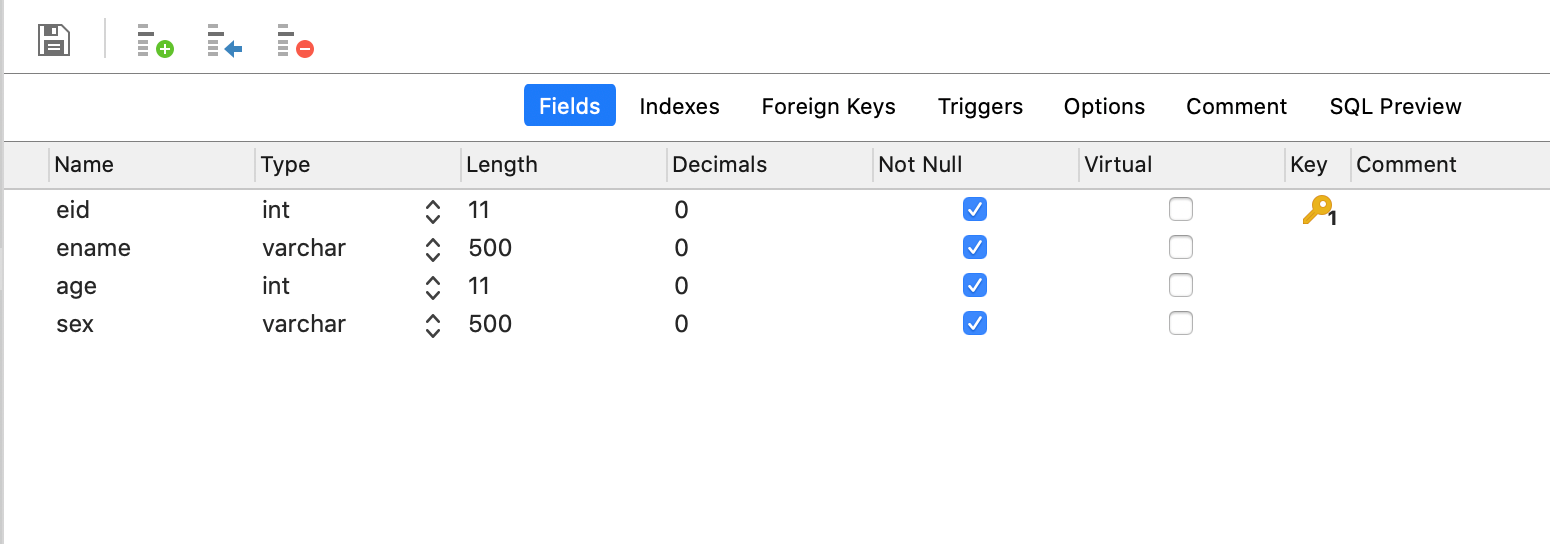
增删改 数据库新增 emp 表
新建 Emp 实体类,并实现 get/set,toString 方法
1
2
3
4
5
6
7
8
9
10
11
12
13
14
15
16
17
18
19
20
21
22
23
24
25
26
27
28
29
30
31
32
33
34
35
36
37
package com.atguigu.jdbctemplate;public class Emp private Integer eid; private String ename; private Integer age; private String sex; public Integer getEid () return eid; } public void setEid (Integer eid) this .eid = eid; } public String getEname () return ename; } public void setEname (String ename) this .ename = ename; } public Integer getAge () return age; } public void setAge (Integer age) this .age = age; } public String getSex () return sex; } public void setSex (String sex) this .sex = sex; } @Override public String toString () return "Emp [eid=" + eid + ", ename=" + ename + ", age=" + age + ", sex=" + sex + "]" ; } }
新建 db.properties 文件
1
2
3
4
jdbc.driver = com.mysql.jdbc.Driver jdbc.url = jdbc:mysql://localhost:3306/ssm jdbc.username = root jdbc.password = 123456
新建 xml 配置文件,并在其中加载 db.properties,创建数据源和创建 jdbcTemplate
1
2
3
4
5
6
7
8
9
10
11
12
13
14
15
16
17
18
19
20
21
22
23
24
25
26
27
28
<?xml version="1.0" encoding="UTF-8"?> <beans xmlns ="http://www.springframework.org/schema/beans" xmlns:xsi ="http://www.w3.org/2001/XMLSchema-instance" xmlns:context ="http://www.springframework.org/schema/context" xsi:schemaLocation ="http://www.springframework.org/schema/beans http://www.springframework.org/schema/beans/spring-beans-4.2.xsd http://www.springframework.org/schema/context http://www.springframework.org/schema/context/spring-context-4.0.xsd" > <context:property-placeholder location ="db.properties" /> <bean id ="dataSource" class ="com.alibaba.druid.pool.DruidDataSource" > <property name ="driverClassName" value ="${jdbc.driver}" > </property > <property name ="url" value ="${jdbc.url}" > </property > <property name ="username" value ="${jdbc.username}" > </property > <property name ="password" value ="${jdbc.password}" > </property > </bean > <bean id ="jdbcTemplate" class ="org.springframework.jdbc.core.JdbcTemplate" > <property name ="dataSource" ref ="dataSource" > </property > </bean > </beans >
最后创建测试类,测试增删改方法
1
2
3
4
5
6
7
8
9
10
11
12
13
14
15
16
17
18
19
20
21
22
23
24
25
26
27
28
29
package com.atguigu.jdbctemplate;import static org.junit.Assert.*;import org.junit.Test;import org.springframework.context.ApplicationContext;import org.springframework.context.support.ClassPathXmlApplicationContext;import org.springframework.jdbc.core.JdbcTemplate;public class TestJdbcTemplate ApplicationContext applicationContext = new ClassPathXmlApplicationContext("jdbc.xml" ); JdbcTemplate jdbcTemplate = applicationContext.getBean("jdbcTemplate" , JdbcTemplate.class ) ; @Test public void test () String sqlString4 = "update emp set ename = ? where eid = ?" ; jdbcTemplate.update(sqlString4, "wangwu" , 2 ); } }
批量操作 1 2 3 4 5 6 7 8 9 @Test public void testBatchUpdate () String sqlString = "insert into emp values (null, ?, ?, ?)" ; List<Object[]> list = new ArrayList<>(); list.add(new Object[] {"a1" , 1 , "nan" }); list.add(new Object[] {"a2" , 2 , "nan" }); list.add(new Object[] {"a3" , 3 , "nan" }); jdbcTemplate.batchUpdate(sqlString, list); }
注意⚠️:在 SQL 语句中有两类不能使用通配符 ?赋值。第一类是批量删除和批量修改。第二类是模糊查询。因为使用通配符赋值(通配符赋值其实相当于 PreparedStatement 的方式, 字符串拼接相当于 Statement 的方式)会默认在赋值字符串的两边加上单引号。导致 SQL 发生变化。
queryForObject queryForObject 可以获取单条数据,并赋给对象。也可以用来获取单个的值,例如 count,sum…
1 2 3 4 5 6 7 8 9 10 11 12 13 14 15 @Test public void testQueryForObject () String sql = "select eid, ename, age, sex from emp where eid=?" ; RowMapper<Emp> rowMapper = new BeanPropertyRowMapper<>(Emp.class ) ; Emp emp = jdbcTemplate.queryForObject(sql, new Object[] {5 }, rowMapper); System.out.println(emp); String sql2 = "select count(1) from emp" ; Integer count = jdbcTemplate.queryForObject(sql2, Integer.class ) ; System.out.println(count); }
query 查询结果,结果是 List
1 2 3 4 5 6 7 8 9 @Test public void testQuery () String sql = "select eid, ename, age, sex from emp" ; RowMapper<Emp> rowMapper = new BeanPropertyRowMapper<>(Emp.class ) ; List<Emp> query = jdbcTemplate.query(sql, rowMapper); for (Emp emp : query) { System.out.println(emp); } }
事务问题演示 新建 BookDao 接口类,里面有三个方法,分别是 selectPrice 查询某本图书的价格,updateSt 更新某本图书的库存,updateBlance 更新账户余额。
1 2 3 4 5 6 7 8 9 package com.atguigu.book.dao;public interface BookDao Integer selectPrice (String bid) ; void updateSt (String bid) void updateBlance (String uid, Integer price) }
BookDaoImpl 实现 BookDao
1 2 3 4 5 6 7 8 9 10 11 12 13 14 15 16 17 18 19 20 21 22 23 24 25 26 27 28 29 30 31 32 33 34 35 36 37 38 39 40 41 package com.atguigu.book.dao.Impl;import org.springframework.beans.factory.annotation.Autowired;import org.springframework.jdbc.core.JdbcTemplate;import org.springframework.stereotype.Repository;import com.atguigu.book.dao.BookDao;@Repository public class BookDaoImpl implements BookDao @Autowired private JdbcTemplate jdbcTemplate; @Override public Integer selectPrice (String bid) Integer price= jdbcTemplate.queryForObject("select price from book where bid=?" , new Object[] {bid}, Integer.class ) ; return price; } @Override public void updateSt (String bid) Integer st = jdbcTemplate.queryForObject("select st from stock where sid = ?" , new Object[] {bid}, Integer.class ) ; if (st < 0 ) { throw new RuntimeException("库存不足" ); }else { jdbcTemplate.update("update stock set st=st-1 where sid=?" , bid); } } @Override public void updateBlance (String uid, Integer price) Integer blance = jdbcTemplate.queryForObject("select blance from money where uid = ?" , new Object[] {uid}, Integer.class ) ; if (blance < price) { throw new RuntimeException("余额不足" ); }else { jdbcTemplate.update("update money set blance = blance - ? where uid = ?" , price, uid); } } }
新建 BookService 接口类,里面创建 buyBook 方法
1 2 3 4 5 package com.atguigu.book.service;public interface BookService void buyBook (String bid, String uid) }
BookServiceImpl 实现接口
1 2 3 4 5 6 7 8 9 10 11 12 13 14 15 16 17 18 19 20 21 22 23 24 package com.atguigu.book.service.Impl;import org.springframework.beans.factory.annotation.Autowired;import org.springframework.stereotype.Service;import org.springframework.transaction.annotation.Propagation;import org.springframework.transaction.annotation.Transactional;import com.atguigu.book.dao.BookDao;import com.atguigu.book.service.BookService;@Service public class BookServiceImpl implements BookService @Autowired private BookDao bookDao; public void buyBook (String bid, String uid) Integer bookPrice = bookDao.selectPrice(bid); bookDao.updateSt(bid); bookDao.updateBlance(uid, bookPrice); } }
新建 BookController 类购买图书
1 2 3 4 5 6 7 8 9 10 11 12 13 14 15 16 17 18 19 20 package com.atguigu.book.controller;import java.util.ArrayList;import java.util.List;import org.springframework.beans.factory.annotation.Autowired;import org.springframework.stereotype.Controller;import com.atguigu.book.service.BookService;@Controller public class BookController @Autowired private BookService bookService; public void buyBook () bookService.buyBook("1" , "1001" ); } }
新建 Test 类,进行测试
1 2 3 4 5 6 7 8 9 10 11 12 13 14 package com.atguigu.book;import org.springframework.context.ApplicationContext;import org.springframework.context.support.ClassPathXmlApplicationContext;import com.atguigu.book.controller.BookController;public class Test public static void main (String[] args) ApplicationContext applicationContext = new ClassPathXmlApplicationContext("book.xml" ); BookController bookController = applicationContext.getBean("bookController" , BookController.class ) ; bookController.buyBook(); } }
现象。当用于多次购买图书的时候,数据库中用户余额不够程序报错 “余额不够” 但是图书的库存却任然在减少,原因就是我们没有对下面的三个数据库操作方法进行事务控制。导致减库存成功,减用户余额失败。
1 2 3 4 5 6 Integer bookPrice = bookDao.selectPrice(bid); bookDao.updateSt(bid); bookDao.updateBlance(uid, bookPrice);
注解配置事务 需要在 xml 中配置事务管理器 并且需要开启注解驱动。配置事务管理器的时候需要依赖 datasource。开启注解驱动时候传入配置好的事务管理器即可。这里需要注意的是 事务管理器有很多种,有基于 Hibernate 的,有基于 JDBC 的 DataSource 的。这里我们使用的是 JdbcTemplate 来操作数据库,所以使用 DataSourceTransactionManager 即可。
1 2 3 4 5 6 7 8 9 10 11 12 13 14 15 16 17 18 19 20 21 22 23 24 25 26 27 28 29 30 31 32 33 <?xml version="1.0" encoding="UTF-8"?> <beans xmlns ="http://www.springframework.org/schema/beans" xmlns:xsi ="http://www.w3.org/2001/XMLSchema-instance" xmlns:context ="http://www.springframework.org/schema/context" xmlns:tx ="http://www.springframework.org/schema/tx" xsi:schemaLocation ="http://www.springframework.org/schema/beans http://www.springframework.org/schema/beans/spring-beans-4.2.xsd http://www.springframework.org/schema/context http://www.springframework.org/schema/context/spring-context-4.0.xsd http://www.springframework.org/schema/tx http://www.springframework.org/schema/tx/spring-tx-4.0.xsd" > <context:component-scan base-package ="com.atguigu.book" > </context:component-scan > <context:property-placeholder location ="db.properties" /> <bean id ="dataSource" class ="com.alibaba.druid.pool.DruidDataSource" > <property name ="driverClassName" value ="${jdbc.driver}" > </property > <property name ="url" value ="${jdbc.url}" > </property > <property name ="username" value ="${jdbc.username}" > </property > <property name ="password" value ="${jdbc.password}" > </property > </bean > <bean id ="jdbcTemplate" class ="org.springframework.jdbc.core.JdbcTemplate" > <property name ="dataSource" ref ="dataSource" > </property > </bean > <bean id ="dataSourceTransactionManager" class ="org.springframework.jdbc.datasource.DataSourceTransactionManager" > <property name ="dataSource" ref ="dataSource" > </property > </bean > <tx:annotation-driven transaction-manager ="dataSourceTransactionManager" /> </beans >
在需要需要加上事务的地方,加上 @Transactional 即可。需要注意的是 Transactional 可以使用在方法上,也可能使用在类上,当使用在类上时,对类中的所有方法都有效。当类和方法都配置 Transactional 时,且都有相同的属性配置,那么这时生效的是近的那个,即采用就近原则。
1 2 3 4 5 6 7 8 9 10 11 12 13 14 15 16 17 18 19 20 21 22 23 24 25 26 27 28 29 package com.atguigu.book.service.Impl;import org.springframework.beans.factory.annotation.Autowired;import org.springframework.stereotype.Service;import org.springframework.transaction.annotation.Transactional;import com.atguigu.book.dao.BookDao;import com.atguigu.book.service.BookService;@Service public class BookServiceImpl implements BookService @Autowired private BookDao bookDao; @Transactional public void buyBook (String bid, String uid) Integer bookPrice = bookDao.selectPrice(bid); bookDao.updateSt(bid); bookDao.updateBlance(uid, bookPrice); } }
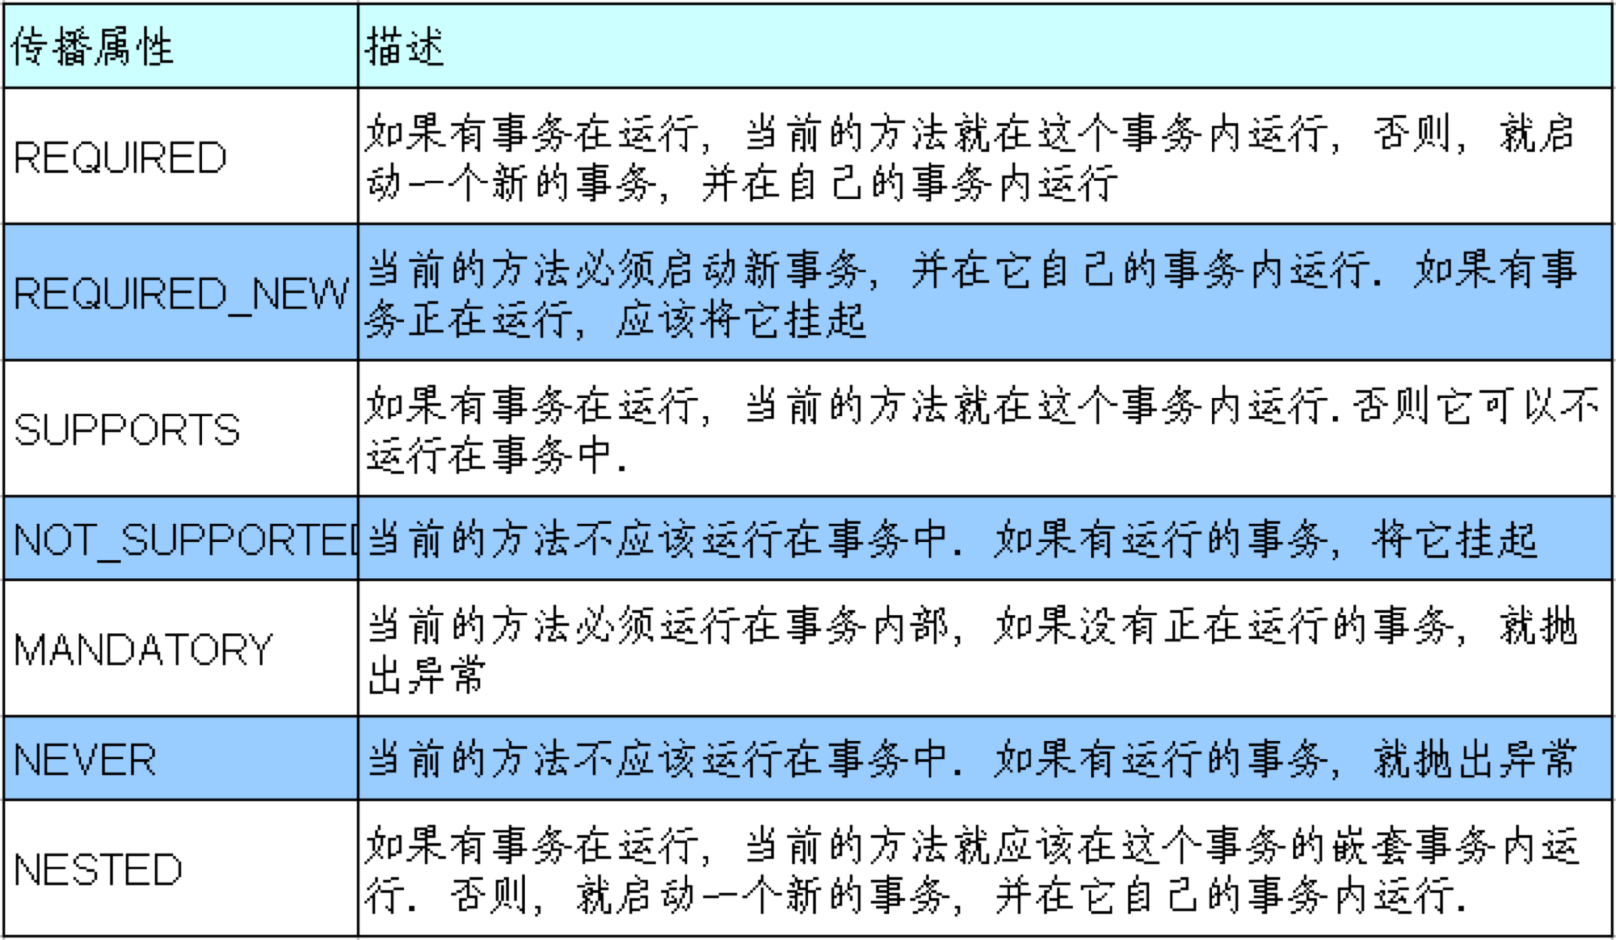
Transactional 属性 propagation 事务的传播行为。A方法 和 B方法 都有事务的情况下,A 方法在调用 B 方法时,会将 A 中的事务传播给 B 方法。B 方法对于事务的处理方式就是事务的传播行为。
这时 B 对事务的处理有两种选择,一种是使用 A 传过来的事务,也就是和 A 相同 propagation = Propagation.REQUIRED。另外一种是不使用 A 传过来的事务,将 A 传过来的事务挂起,自己新建一个事务。propagation = Propagation.REQUIRES_NEW 默认是使用调用者传递过来的传播行为。即 REQUIRED
例子说明:这里新建 CashierServiceImpl 类,并实现 Cashier 接口,重写 checkOut 结账方法。checkOut 这里是支持购买的书籍多本一起结账,也就是多次调用 bookService 中的 buyBook 方法。这里已经为 CashierServiceImpl 类加上了 Transactional。这里就是一个事务的传播行为,因为 checkOut 有事务(CashierServiceImpl 类上加了,那么里面的方法就都会有)buyBook 里面也有事务。因为我们没有对 buyBook 中事务的属性进行修改,所以 buyBook 中 Transactional 的 propagation 默认为 REQUIRED 。即如果在循环中出现一次失败,那么整个循环都会回滚。反之,如果 buyBook 中 Transactional 的 propagation 值为 REQUIRES_NEW 那么即每次循环 buyBook 中的事务都是新建的,如果出现失败,则不会导致全部回滚。
1 2 3 4 5 6 7 8 9 10 11 12 13 14 15 16 17 18 19 20 21 22 23 24 25 package com.atguigu.book.service.Impl;import java.util.List;import org.springframework.beans.factory.annotation.Autowired;import org.springframework.stereotype.Service;import org.springframework.transaction.annotation.Transactional;import com.atguigu.book.service.BookService;import com.atguigu.book.service.Cashier;@Service @Transactional public class CashierServiceImpl implements Cashier @Autowired private BookService bookService; @Override public void checkOut (String uid, List<String> bids) for (String bid : bids) { bookService.buyBook(bid, uid); } } }
Spring定义了7种类传播行为。最常用的是 REQUIRED 和 REQUIRES_NEW。默认是 REQUIRED。
isolation isolation 即事务的隔离级别。假设现在有两个事务:Transaction01和Transaction02并发执行。
1) 脏读
①Transaction01 将某条记录的 AGE 值从 20 修改为 30。
②Transaction02 读取了 Transaction01 更新后的值:30。
③Transaction01 回滚,AGE 值恢复到了 20。
④Transaction02 读取到的 30 就是一个无效的值。
2) 不可重复读
①Transaction01 读取了 AGE 值为20。
②Transaction02 将 AGE 值修改为30。
③Transaction01 再次读取 AGE 值为30,和第一次读取不一致。
3) 幻读
①Transaction01 读取了 STUDENT 表中的一部分数据。
②Transaction02 向 STUDENT 表中插入了新的行。
③Transaction01 读取了 STUDENT 表时,多出了一些行。
数据库系统必须具有隔离并发运行各个事务的能力,使它们不会相互影响,避免各种并发问题。一个事务与其他事务隔离的程度称为隔离级别 。SQL 标准中规定了多种事务隔离级别,不同隔离级别对应不同的干扰程度,隔离级别越高,数据一致性就越好,但并发性越弱。
1) 读未提交 :READ UNCOMMITTED
允许 Transaction01 读取 Transaction02 未提交的修改。
2) 读已提交 :READ COMMITTED
要求 Transaction01 只能读取 Transaction02 已提交的修改。
3) 可重复读 :REPEATABLE READ
确保 Transaction01 可以多次从一个字段中读取到相同的值,即 Transaction01 执行期间禁止其它事务对这个字段进行更新。
4) 串行化 :SERIALIZABLE
确保 Transaction01 可以多次从一个表中读取到相同的行,在 Transaction01 执行期间,禁止其它事务对这个表进行添加、更新、删除操作。可以避免任何并发问题,但性能十分低下。
1) 各个隔离级别解决并发问题的能力见下表
脏读
不可重复读
幻读
READ UNCOMMITTED (读未提交)
有
有
有
READ COMMITTED (读已提交)
无
有
有
REPEATABLE READ (可重复读)
无
无
有
SERIALIZABLE (串行化)
无
无
无
2) 各种数据库产品对事务隔离级别的支持程度
Oracle
MySQL
READ UNCOMMITTED
×
√
READ COMMITTED
√(默认)
√
REPEATABLE READ
×
√(默认)
SERIALIZABLE
√
√
用@Transactional注解声明式地管理事务时可以在@Transactional的isolation属性中设置隔离级别。
timeout 在事务强制回滚前最多可执行(等待)的时间。例如下面的例子中,如果 3 秒没反应则会强制回滚。
1 2 3 4 5 6 7 8 9 @Transactional (propagation = Propagation.REQUIRED, timeout = 3 ) public void buyBook (String bid, String uid) Integer bookPrice = bookDao.selectPrice(bid); bookDao.updateSt(bid); bookDao.updateBlance(uid, bookPrice); }
readOnly 指定当前事务中的一系列操作是否为只读。若设置为只读(readOnly = true),不管事务中有没有写的操作,那么 MySQL 在请求访问数据的时候不加锁。
但是如果有写操作的情况,建议一定不能设置 readOnly = true。因为这时没了锁,但是还对数据进行写的操作,那么就容易出现很多问题。
rollbackFor | rollbackForClassName | noRollbackFor | noRollbackForClassName rollbackFor | rollbackForClassName 用于指定事务发生什么错误时进行回滚。rollbackFor 传入的是错误类型的 class 对象数组。rollbackForClassName 传入的是全现定名。
noRollbackFor | noRollbackForClassName 用于指定事务发生什么错误时不进行回滚。
1
2
3
4
5
6
7
8
9
@Transactional (noRollbackFor = {NullPointerException.class } ,rollbackFor = {RuntimeException.class }) public void buyBook (String bid , String uid ) Integer bookPrice = bookDao.selectPrice(bid); bookDao.updateSt(bid); bookDao.updateBlance(uid, bookPrice); }
XML 配置事务 1 2 3 4 5 6 7 8 9 10 11 12 13 14 15 16 17 18 19 20 21 22 23 24 25 26 27 28 29 30 31 32 33 34 35 36 37 38 39 40 41 42 43 44 45 46 47 48 49 50 51 52 53 <?xml version="1.0" encoding="UTF-8"?> <beans xmlns ="http://www.springframework.org/schema/beans" xmlns:xsi ="http://www.w3.org/2001/XMLSchema-instance" xmlns:context ="http://www.springframework.org/schema/context" xmlns:tx ="http://www.springframework.org/schema/tx" xmlns:aop ="http://www.springframework.org/schema/aop" xsi:schemaLocation ="http://www.springframework.org/schema/beans http://www.springframework.org/schema/beans/spring-beans-4.2.xsd http://www.springframework.org/schema/context http://www.springframework.org/schema/context/spring-context-4.0.xsd http://www.springframework.org/schema/aop http://www.springframework.org/schema/aop/spring-aop-4.0.xsd http://www.springframework.org/schema/tx http://www.springframework.org/schema/tx/spring-tx-4.0.xsd" > <context:component-scan base-package ="com.atguigu.book_xml" > </context:component-scan > <context:property-placeholder location ="db.properties" /> <bean id ="dataSource" class ="com.alibaba.druid.pool.DruidDataSource" > <property name ="driverClassName" value ="${jdbc.driver}" > </property > <property name ="url" value ="${jdbc.url}" > </property > <property name ="username" value ="${jdbc.username}" > </property > <property name ="password" value ="${jdbc.password}" > </property > </bean > <bean id ="jdbcTemplate" class ="org.springframework.jdbc.core.JdbcTemplate" > <property name ="dataSource" ref ="dataSource" > </property > </bean > <bean id ="dataSourceTransactionManager" class ="org.springframework.jdbc.datasource.DataSourceTransactionManager" > <property name ="dataSource" ref ="dataSource" > </property > </bean > <aop:config > <aop:pointcut expression ="execution(* com.atguigu.book_xml.service.Impl.*.*(..))" id ="pointCut" /> <aop:advisor advice-ref ="tx" pointcut-ref ="pointCut" /> </aop:config > <tx:advice transaction-manager ="dataSourceTransactionManager" id ="tx" > <tx:attributes > <tx:method name ="buyBook" /> <tx:method name ="checkOut" /> <tx:method name ="add*" /> <tx:method name ="select*" read-only ="true" /> </tx:attributes > </tx:advice > </beans >
测试事务是否生效
1 2 3 4 5 6 7 8 9 10 11 12 13 14 15 package com.atguigu.book_xml;import org.springframework.context.ApplicationContext;import org.springframework.context.support.ClassPathXmlApplicationContext;import com.atguigu.book_xml.controller.BookController;public class Test public static void main (String[] args) ApplicationContext applicationContext = new ClassPathXmlApplicationContext("book_xml.xml" ); BookController bookController = applicationContext.getBean("bookController" , BookController.class ) ; bookController.buyBook(); } }
代码地址

