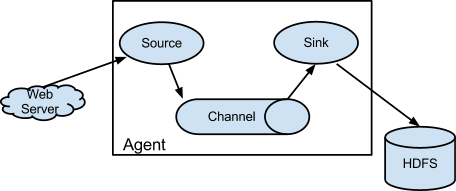
概念

Source: 用户要根据自己的数据源的类型,选择合适的 source 对象
Sink: 用户需要根据自己的数据存储的目的地的类型,选择合适的 sink 对象。
Interceptors: 在 source 将 event 放入到 channel 之前,调用拦截器对 event 进行拦截和处理。
Channel Selectors: 当一个 source 对接多个 channel 时,由 Channel Selectors选取 channel 将 event 存入。
Sink Processor: 当多个 sink 从一个 channel 取数据时,为了保证数据的顺序,由 sink processor 从多个 sink 中挑选一个 sink,由这个 sink 干活。
安装 Flume
版本区别
0.9 之前称为 flume og
0.9 之后为 flume ng(目前都使用此版本)
1.7之前,没有taildirsource,1.7及之后有taildirsource
安装
- 解压
1 | tar -zxvf apache-flume-1.7.0-bin.tar.gz -C /opt/module/ |
- 添加到环境变量
1 | JAVA_HOME=/opt/module/jdk1.8.0_121 |
启动agent
1 | flume-ng agent -n agent的名称 -f agent配置文件 -c 其他配置文件所在的目录 -Dproperty=value |
监控端口数据案例
通过 netcat 工具向本机的 4444 端口发送数据,flume 监控本机的 4444 端口,通过 flume 的 source 端读取数据,flume 将获取的数据通过 sink 端写出到控制台。
选择 Source。因为 source 是 netcat,所以这里选择 netcat source,查看 netcat source 参数信息

选择 Sink。使用 logger(日志输出器)将 event 输出到文件或者控制台,所以这里选择 sink 的时候就选择 logger sink

选择 Channel。这里使用 Memory Channel,特点是高吞吐量,但是可能会丢失些数据。

所以配置文件如下
1 | # a1 是 agent 的名称,a1 中定义了一个叫 r1 的 source,如果有多个,使用空格间隔 |
在/opt/module/apache-flume-1.7.0-bin 目录下新建myagents目录,并创建名为 netcat-logger-memory.conf 的文件, 用于存储自定义的 agent 文件。内容就是上面的内容
这里需要注意,flume 的日志配置默认为文件中,所以需要修改 /opt/module/apache-flume-1.7.0-bin/conf/log4j.properties文件,将其中的 flume.root.logger 的值修改为 DEBUG,console
1 | flume.root.logger=DEBUG,console |
启动 agent
1 | [rexyan@hadoop10 myagents]$ flume-ng agent -n a1 -c /opt/module/apache-flume-1.7.0-bin/conf/ -f /opt/module/apache-flume-1.7.0-bin/myagents/netcat-logger-memory.conf |
在另一个终端里面安装 nc,并且启动 nc 发送消息
1 | yum install -y nc # 安装 nc |

