创建项目
安装好环境后,使用以下命令就能创建一个名称为 testsite 的项目。
1 | django-admin startproject testsite |
当使用该命令创建项目时候,会调用 django/core/management/commands/startproject.py 中的 Command。
Command 中的 handle 会调用父类 handle 方法 ,传入 project, 项目名称,目录,options1
2
3
4
5
6
7
8
9
10
11
12
13
14
15class Command(TemplateCommand):
help = (
"Creates a Django project directory structure for the given project "
"name in the current directory or optionally in the given directory."
)
missing_args_message = "You must provide a project name."
def handle(self, **options):
project_name = options.pop("name")
target = options.pop("directory")
# Create a random SECRET_KEY to put it in the main settings.
options["secret_key"] = SECRET_KEY_INSECURE_PREFIX + get_random_secret_key()
# 调用父类 ,传入 project, 项目名称,目录,options
super().handle("project", project_name, target, **options)
之后便会检查项目名称,传入的目录等信息,然后构建渲染模版的 Context 上下文信息。查看源代码
如果没有指定模版,那么会使用 django/conf/project_template 中的模版进行项目的创建。
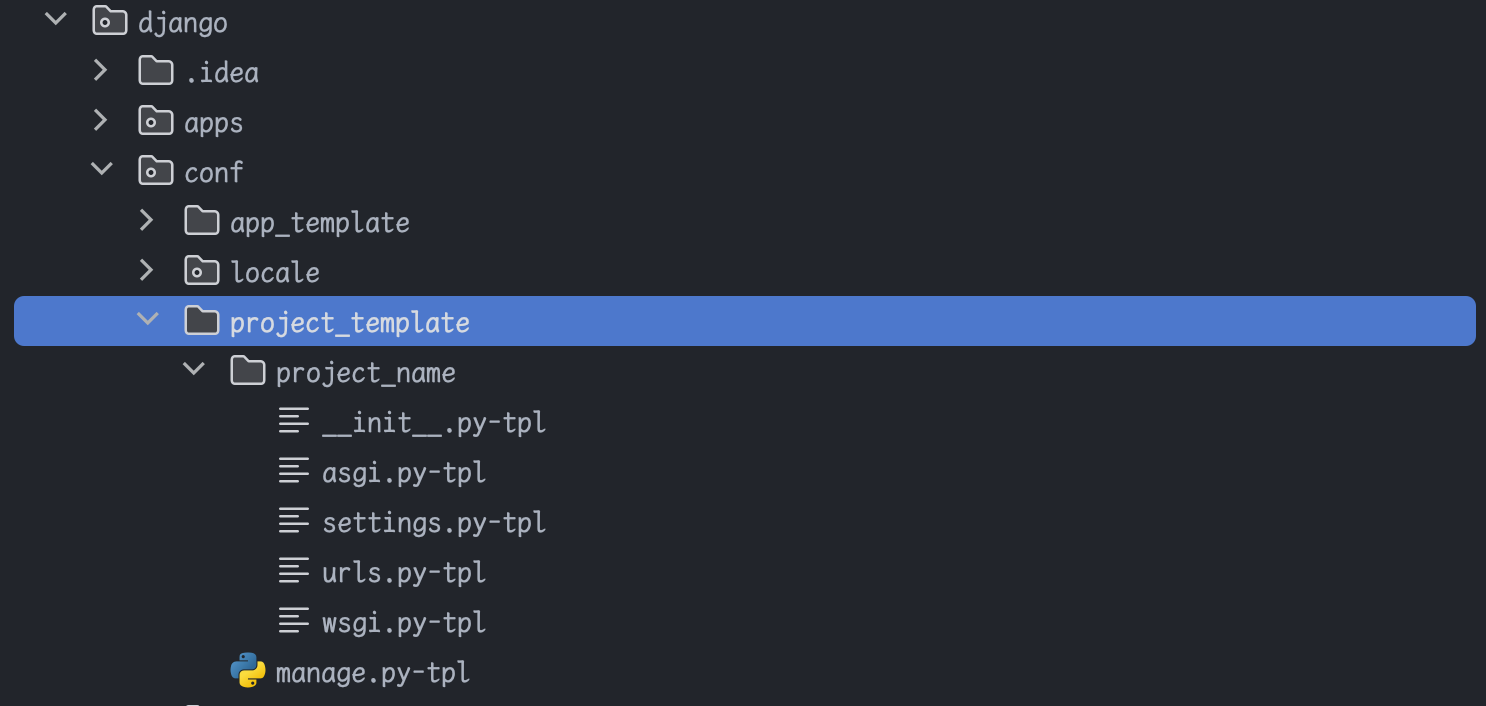
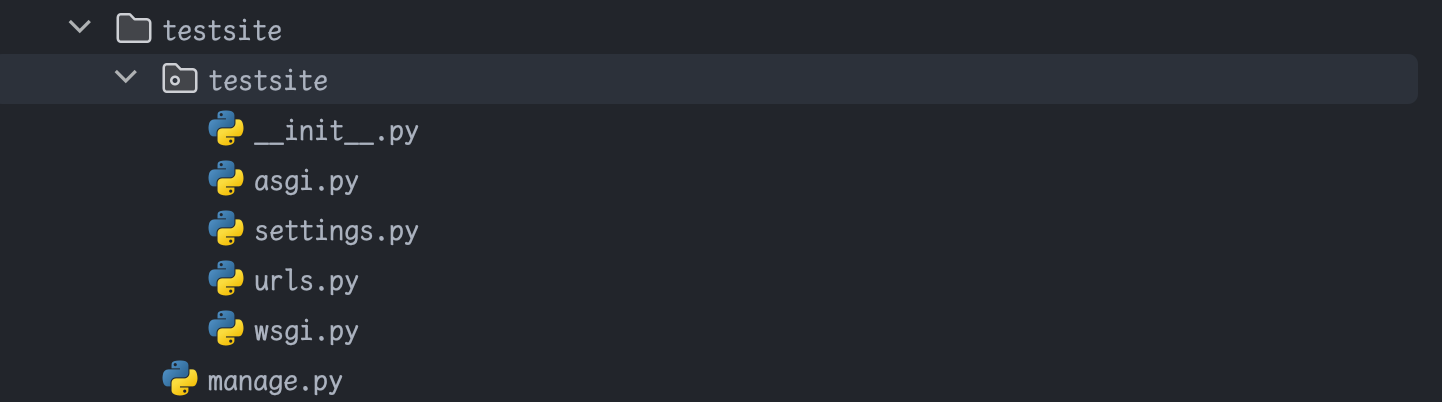
例如上述命令创建出来的目录如下:
交互式命令行
在上面我们创建的项目 testsite 中,使用 python manage.py shell 即可进入交互式命令行,这其中背后的实现是在 django/core/management/commands/shell.py 中的 handle 方法。详细流程如下:
- 如果使用了 -c 或者 –command 传入了命令,那么就执行该命令,然后退出
- 如果没有传入命令,那么看是否传入了 -i 或者 –interface 来指定专门的 shell,没有指定,则默认为 “ipython”, “bpython”, “python”
- 循环调用 “ipython”, “bpython”, “python” 这三个 shell,看哪个成功。
为什么直接在项目下使用 python 进入交互式命令行后导入包会报错,而使用 python manage.py shell 进入交互式命令行后导入包却不报错?
先说下结论:使用 python manage.py shell 的方式,会设置一个环境变量,和设置一个属性值:
- 会设置
DJANGO_SETTINGS_MODULE环境变量的值,直接使用 python 进行交互式命令行则没有这个值。 - Apps 类中有一个 apps_ready 属性,默认值为 false,在导入包的过程中会去检查 apps_ready 的值是否为 true,而使用 python manage.py shell 命令,则会调用 execute 方法,execute 里面则设置了 apps_ready 值为 true。查看源代码
Migration
Migration 是迁移的抽象,也可以理解为每次迁移的动作。dependencies字段代表依赖,operations字段代表具体的操作,initial字段代表是否为第一次等,主要的方法如下:查看源代码
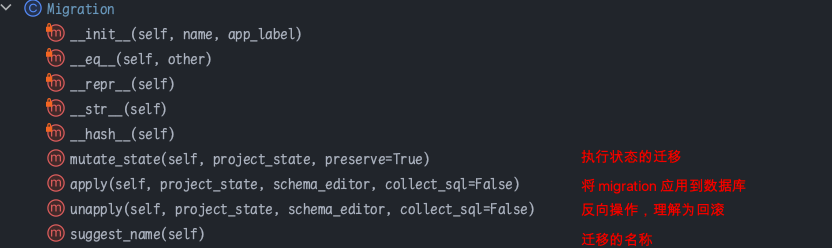
mutate_state 方法用于在迁移过程中修改数据库模型的状态,确保数据库与模型定义保持同步。
apply 方法用于将迁移应用到数据库中
使用 python manage.py makemigrations 命令生成 migrations 迁移文件后,生成的迁移文件的内容中的 Migration 类就是继承上述的 Migration 类,生成的内容中可能包含上述介绍的字段,例如 dependencies,operations,initial 等。下面是个示例:
1 | from django.db import migrations, models |
MigrationRecorder
MigrationRecorder类,对应数据库表中的 django_migrations 表,里面记录了每次 migration 的记录,有以下信息值得关注:
- 里面的 Migration 方法采用懒加载的方式返回一个 Migration 类
- 使用 MigrationRecorder 的时候需要传入一个 connection,可以使用
django/db/__init__.py里面的 connection,connection 返回 default 数据库的连接 - migration_qs 方法返回所有的查询记录
- has_table 方法判断表是否存在
- ensure_schema 方法判断 django_migrations 表是否存在,不存在则创建
- applied_migrations 方法返回所有的migration 记录
- record_applied 方法新增一条 migration 记录信息
- record_unapplied 方法删除一条 migration 记录
- flush 删除所有 migration 记录信息
MigrationGraph
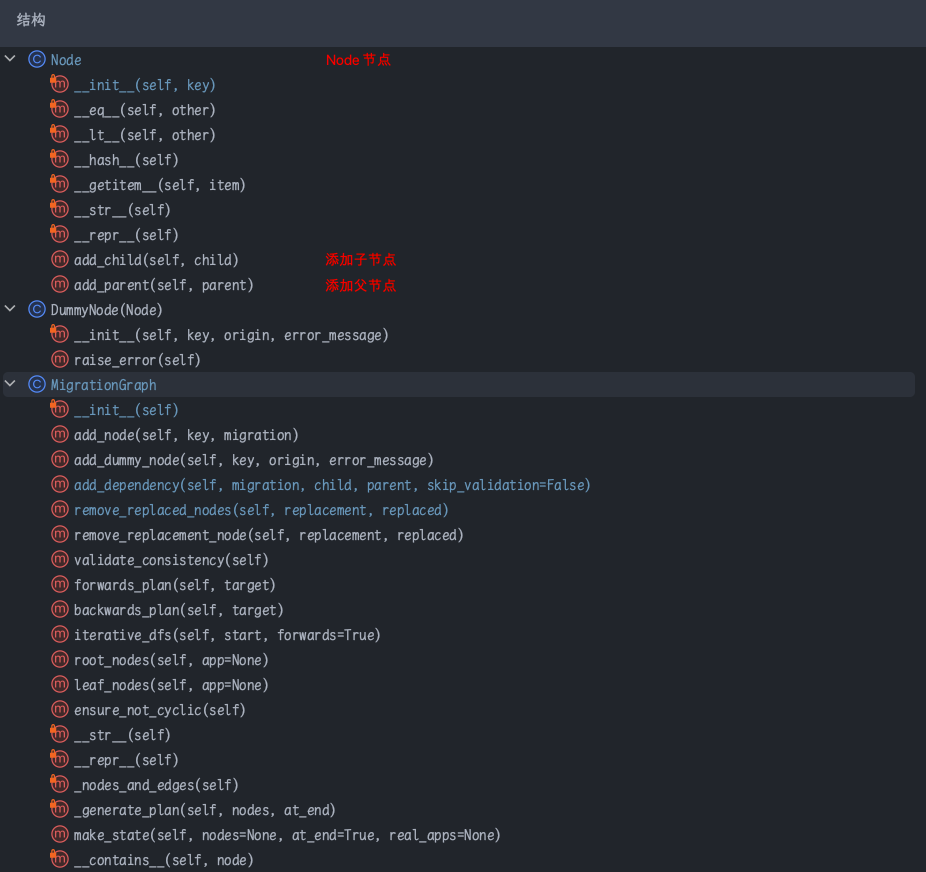
每个 Migration 之间存在相互的依赖关系,比如一个的执行依赖另一个。Django 中使用 MigrationGraph 来构建这些关系。代码位于 django/db/migrations/graph.py。主要有以下信息值得关注:
- 使用 Node 类表示节点,Node 类提供的添加节点的方法
- 使用 DummyNode 表示一个虚拟节点,在下面的 MigrationGraph 类中,validate_consistency 方法会判断一个 Graph 中有没有 DummyNode,有则认为 Graph 有异常。
- MigrationGraph 中提供了添加节点,添加 DummyNode,添加依赖,替换节点,dfs 遍历 Graph,获取所有根节点,子节点 等方法。
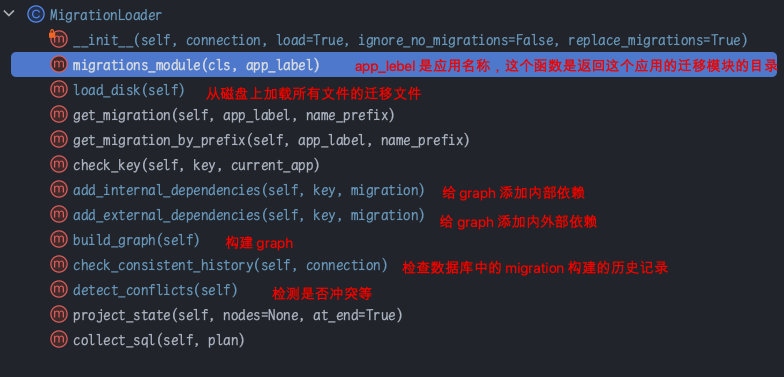
MigrationLoader
MigrationLoader 的作用是,加载所有的应用下的 migrations 下的文件,并使用 MigrationGraph 构建依赖关系图。在这其中用到的上面介绍的三个类。主要方法如下:
makemigrations 原理
该命令事根据检测到的模型变化来创建新的迁移文件。使用的时候需要传入一个应用名称 app_label。执行命令时候,调用的代码在 django/core/management/commands/makemigrations.py。执行过程大致如下:
- 判断迁移名称是否合法
- 检查 app 名称是否存在,app 是否就绪等
- 创建一个 MigrationLoader 对象,MigrationLoader 中新建了一个 graph
- 调用 loader 的 check_consistent_history 方法,检查所有应用的迁移记录,检查数据库中的 migration 记录是否正常。
- 检查是否有冲突(存在多个叶子节点)。有冲突时,可以使用 merge 选项处理,所以这里会判断冲突和 merge 命令是不是一起使用的
- 创建 MigrationAutodetector 对象,看看第一个需要做什么才能使其与第二个匹配(第二个通常是项目的当前状态)
- 通过上述 MigrationAutodetector 对象的 changes 方法,检查 model 和 migration 文件是否有变化,返回值是app名称和变化的 Migration 对象。
如果没变化则提示没有变化,有变化则将变化的迁移内容写入迁移文件。
migrate 原理
migrate 命令用于执行真正的迁移,调用的代码在 django/core/management/commands/migrate.py 下,migrate 的步骤主要如下:
- 获取 connection,并且执行不同数据库的 prepare 操作
- 创建一个 migration 执行器 MigrationExecutor 实例,里面一个 MigrationLoader 和 MigrationRecorder
- 检测是否冲突(有多个叶子节点)
- 中间执行很多参数的校验
- 执行 executor.migration_plan(targets) 获取到迁移计划
- 为 migrate 创建 project_state 用于保存状态
- 运行 executor.migrate 执行迁移
在迁移前后都有信号的发送